Table of Contents
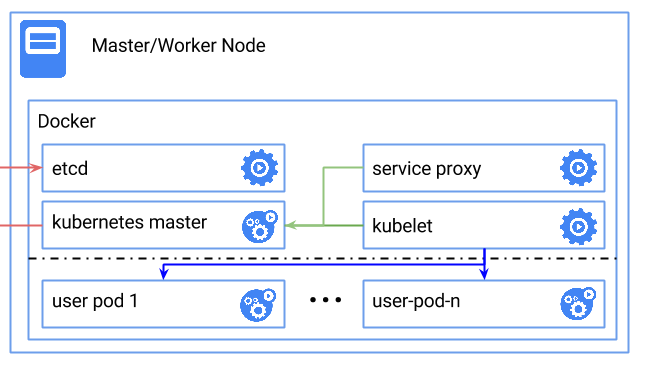
The following instructions show you how to set up a simple, single node Kubernetes cluster using Docker.
Here's a diagram of what the final result will look like:
CONFIG_RESOURCE_COUNTERS=y
    CONFIG_MEMCG=y
    CONFIG_MEMCG_SWAP=y
    CONFIG_MEMCG_SWAP_ENABLED=y
CONFIG_MEMCG_KMEM=yGRUB_CMDLINE_LINUX="cgroup_enable=memory swapaccount=1"NOTE: The above is specifically for GRUB2. You can check the command line parameters passed to your kernel by looking at the output of /proc/cmdline:
$cat /proc/cmdline
    BOOT_IMAGE=/boot/vmlinuz-3.18.4-aufs root=/dev/sda5 ro cgroup_enable=memory
swapaccount=1docker run --net=host -d gcr.io/google_containers/etcd:2.0.12 /usr/local/bin/etcd --addr=127.0.0.1:4001 --bind-addr=0.0.0.0:4001 --data-dir=/var/etcd/datadocker run \
--volume=/:/rootfs:ro \
--volume=/sys:/sys:ro \
--volume=/dev:/dev \
--volume=/var/lib/docker/:/var/lib/docker:ro \
--volume=/var/lib/kubelet/:/var/lib/kubelet:rw \
--volume=/var/run:/var/run:rw \
--net=host \
--pid=host \
--privileged=true \
-d \
gcr.io/google_containers/hyperkube:v1.0.1 \
/hyperkube kubelet --containerized --hostname-override="127.0.0.1" --address="0.0.0.0" --api-servers=http://localhost:8080 --config=/etc/kubernetes/manifestsThis actually runs the kubelet, which in turn runs a pod that contains the other master components.
docker run -d --net=host --privileged gcr.io/google_containers/hyperkube:v1.0.1 /hyperkube proxy --master=http://127.0.0.1:8080 --v=2At this point you should have a running Kubernetes cluster. You can test this by downloading the kubectl binary (OS X) (linux)
Note: On OS/X you will need to set up port forwarding via ssh:
boot2docker ssh -L8080:localhost:8080List the nodes in your cluster by running:
kubectl get nodesThis should print:
NAME        LABELS    STATUS
127.0.0.1   <none>    Ready
If you are running different Kubernetes clusters, you may need to specify -s http://localhost:8080 to select the local cluster.
kubectl -s http://localhost:8080 run nginx --image=nginx --port=80Now run docker ps you should see nginx running. You may need to wait a few minutes for the image to get pulled.
kubectl expose rc nginx --port=80Run the following command to obtain the IP of this service we just created. There are two IPs, the first one is internal (CLUSTER_IP), and the second one is the external load-balanced IP.
kubectl get svc nginxAlternatively, you can obtain only the first IP (CLUSTER_IP) by running:
kubectl get svc nginx --template={{.spec.clusterIP}}Hit the webserver with the first IP (CLUSTER_IP):
curl <insert-cluster-ip-here>Note that you will need run this curl command on your boot2docker VM if you are running on OS X.
Many of these containers run under the management of the kubelet binary, which attempts to keep containers running, even if they fail. So, in order to turn down
the cluster, you need to first kill the kubelet container, and then any other containers.
You may use docker kill $(docker ps -aq), note this removes all containers running under Docker, so use with caution.